Wednesday, July 20, 2011

More about the eagle T-Shirt


kbenco is right (thanks for your comment), I was not very generous with information on the reverse applique. The backing fabric is the same quality as the T-Shirt fabric (I bought two T-Shirts of the same brand). The whole method is explained in this book: http://alabamachanin.com/books/alabama-stitch-book
There is lots of inspiration in the book, but the method can more or less be figured out by looking at a (good) photo. I found the eagle stencil googling "eagle stencil". I would like to design my own stencil - "next time". I applied the fabric paint with a sponge, that worked better than what I tried with a brush on a sample, but a spray bottle would probably be best. Then I stitched around all shapes by hand, through the top and backing layer, using double thread. I left the knots on the right side, as suggested in the book, as that reminds me of feathers. Finally you cut out the inside of the shapes until about 5 mm from the stitching line, careful not to cut through the backing fabric. And trim away the excess fabric on the inside of the T-Shirt. The eagle head in the photo is about 30 cm wide. Here is a photo of the inside of the T-Shirt. The fabric is actually white, but I took the photos late in the evening.
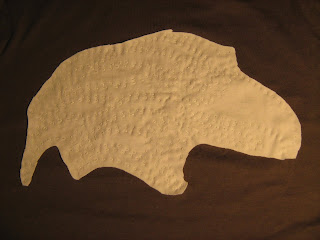

By the way I did all the stitching while DH was watching the Tour de France, I sat right behind him at the dining table, and I was glad - but not surprised - that he did not ask what I was doing.

Sunday, July 17, 2011

More gifts

I made towel with a hood for a school friend's baby.

The ribbon shows some Bavarian motifs, as my friend lives in Bavaria now and is teased with that.

From a thick elastic and some beads I made a lane-counting-wristband for a friend who takes me swimming sometimes. I have no idea if it works, and have not given it to her yet.


For my husband I reverse-appliqued an eagle on a purchased T-Shirt.

This was my inspiration:
http://alabamachanin.com/items/eagle-shirt

Gifts

I made several gifts the past month.
A name banner for the baby of a study friend of mine:

The measurements are from the book "One Yard wonders". I glued on the felt letters with textile glue. The numbers are pinned on and exchangeable, now they show the date of birth but can be changed to show the age. I also made a little bag to store the banner in, and the other numbers. The fabric is from Liberty, my brother bought it for me one christmas, I think he had little clue what to buy (when I was in London earlier visiting him he waited outside Liberty), but everybody in the shop seemed to want this, so this is what he chose. I still have some fabric left. Maybe I'll make something for his daughter from it one day. But this banner was a lot of more work than I thought!


For my sister, who is travelling a lot, I made a little pen case with an elastic to fix it to a notebook. First photo shows the miniature pens that should go into it, and my paper model.

Then I made a test model, to figure out how to sew together the outer fabric and the self-fabric lining, because I challenged myself to make it so that no stitches are visible on the outside.

And here is the finished thing.